Over the British summer I noticed that temperature gauge was creeping up a bit higher than usual whilst stuck in traffic and having spent a few uncomfortable moments with the internal heater turned full on to compensate and cool down the engine I decided it was time to investigate further. Having checked the level of coolant was ok and that the fans were kicking in roughly when the needle hits the half way mark on the gauge, I went for the next common cause the thermostat. At around £20 for a Porsche one they're not cheap, but going through the cars history I could see it hadn't been replaced for a long while.
THE TASK
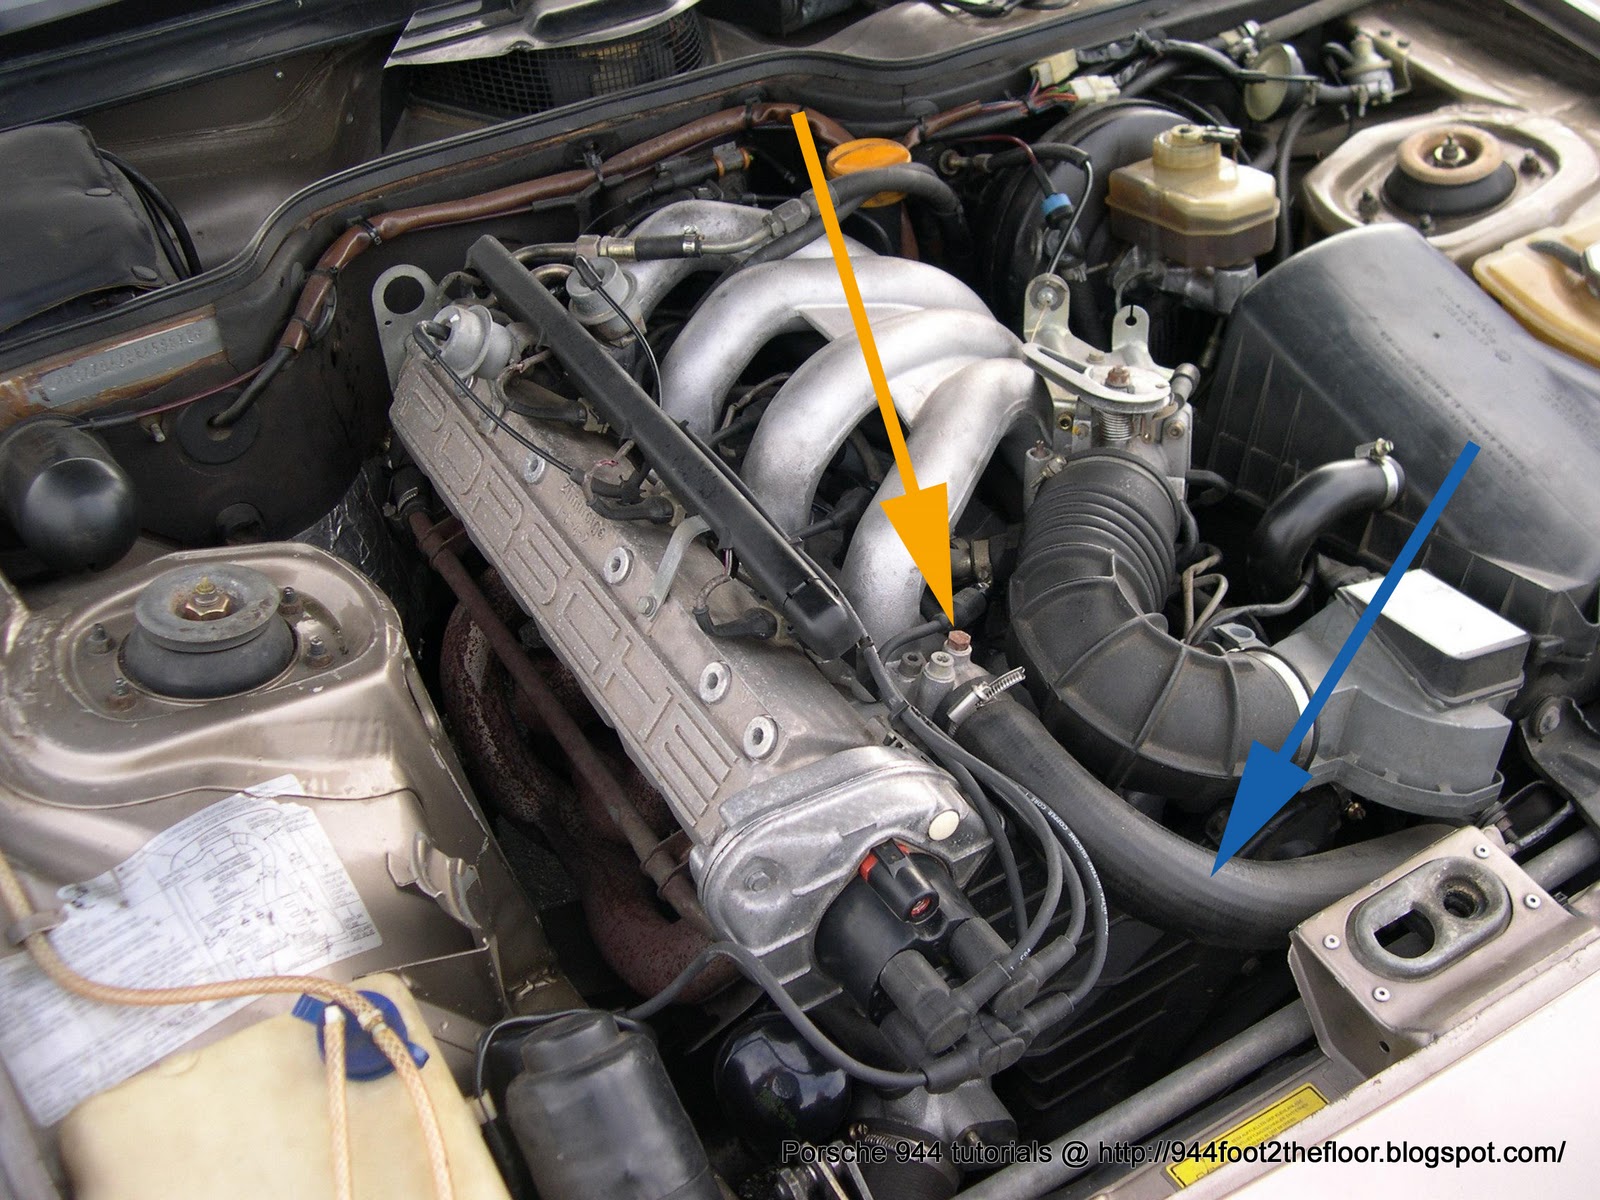
The thermostat can be a tricky thing to get at, most guides say that need to approach it from the underside of the car. This isn't true, as long as you have the right tools and remove the distributor cap then you can get to it from the top front of the engine.
You will need the following:
Stumpy flat-bladed screwdriver
Long flat bladed screwdriver
Long bent-nose snap ring / circlip pliers
Small torch
Dentists mirror
Catch bowl for old coolant
13mm spanner
THE HOW TO
(Amateur mechanic job time approx. 1 hour)
Pull off the HT leads that connect to the distributor cap, remember which order they attach. Then remove the distributor cap using the small dumpy flat-bladed screwdriver to release it's locking pins.
Place a catch bowl under the engine bay, and then release the screw on the hose clamp, pull the hose off the water pump, a rush of coolant should come out. Watch to see if the coolant is dirty/murky/oily as this could indicate other problems.

Push the end of the hose out of the way below the water pump inlet. The thermostat is then located directly inside the water pump inlet as shown by the orange arrow. Put your fingers inside the hole and have a feel around to suss out the position of the snap ring. Use a torch and a small mirror if you have to, it is very tricky to see the location of the snap ring holes.

The next part is where the frustration levels are likely to rise. If you have anything other than snap ring pliers I suggested at the beginning of this tutorial then you are going to make life very very difficult for yourself.
Take the snap ring pliers and locate the two prongs into the holes in the snap ring, squeeze the snap ring and make sure you pull it out parallel to the hole entrance. This is likely to take several attempts, I think it took me about 4-5 goes before I got it out.
This is what you should end up with


Once the snap ring is out you should just be able to pull out the thermostat, take note of which end goes in first. There is a rubber washer that runs around its outer edge, make sure it doesn't get left inside the water pump.
Here's the thermostat removed from the water pump. The base shows that it is rated at 80 degrees centigrade.

The next step involves testing the thermostat to make sure it is opening at the correct temperature. Simply plop it in a pan of water and boil it until the temperature reaches its range. If it opens all the way at the temp stated your thermostat is fine, if it opens later then it is time for a replacement.
Here's the test.
Here's a photo of my old (left) and new (right) thermostat. Notice the difference in the size of the rubber seal around the edge.


Once you've determined whether the thermostat is faulty or ok it's time to fit it back. The process is the reversal of removal. The only watch out is making sure the snap ring sits squarely into its recess, before you insert the thermostat run your finger round the inside of the water pump inlet and you'll feel the recess the snap ring fits into. Once the thermostat is fitted and all the hoses are connected back up you need to refill the system. First set the heater switch to maximum inside the car. Then you need to release the coolant bleed screw on top of the upper most radiator hose (shown by orange arrow below). Then fill the system at the header tank until coolant can be seen coming from this hole. Close the bleed valve and belch the system by squeezing the top hose (shown by blue arrow). Repeat the process until you can't fill the coolant tank any more.
Next run the car up to temperature, this will cause the thermostat to open and release coolant into the rest of the system, keep an eye on the fill level of the coolant tank. Turn off the car and fill then belch the system repeatedly until no more coolant topping up is needed. Run the car up to temperature again and check the fill level. If all is ok just have a final check that none of the hoses are weeping and you should be done, if not just keep topping up the coolant until the level stops dropping.
Dave, what make were your snap ring pliers? I havce looked for a long nosed pair, but haven't found one yet!
ReplyDeleteAnd where did you get them?
They were Laser 4739's. Got them from Amazon, just click the link in the list of tools at the top of the blog. Cheers
ReplyDeleteHi Dave, another 944 owner here.
ReplyDeleteThis is a fantastic blog, I really appreciate how you explain things and the photos you use.
At the minute there's no easy 944 "landing page", and there's quite a bit of 944 information hidden about on the internet that takes time to find.
So with that in mind, I'd build a site that:
1. People could submit technical articles (like this article) and have them edited and published.
2. Would link to many of the other important articles and resources.
This would all be not-for-profit too, no advertisements or anything obscene. I'm a web developer by trade so this sort of thing is second nature for me.
Would you be interested in taking part?
Thanks!
Rowan Lewis - thatguy@psychoticmeow.com
I have just done mine again, tho i dont remove the dizzy cap, hotter stat than usual and new seals and my car still runs cold, fan dosnt come on much so that ok.
ReplyDeleteany ideas?
thanks
Sounds okay to me Stuart.
DeleteThis is great. In Sydney my 944 N/A can get a bit hot but never over the top white line on the guage. Alsways just below and then down it goes as I move along or the twin fans blast into life. However, I will replace the thermo today ( OEM not a Chinese copy ) and give the old girl a flush.
ReplyDeleteI'll let you know how it all goes.
Yep, give it a go and see how it goes
DeleteHi again,
DeleteSorry mate one more thing. I got a neoprene/hard rubber seal for the bottom of the Thermo when I bought a new unit. I guess this sits into the body at the bottom of the Thermo space ?
Any advice on getting the old one out or is this simple ?
Regards
Neoprene/hard rubber seal? I'm not sure what you mean? Unless your talking about the black rubber seal shown on both thermostats in picture 8?
DeleteIt seals between the bottom of the thermostat ( on the face of the area where the temp is stamped ) and the body of the thermostat housing. The Porsche parts place in Sydney gave it to me when I bought the new 'stat. The rubber ring is at the larger or top end of the 'stat and that is secure and in place on the new ( 83 deg. C ) unit. Can I send you a pix some way ?
ReplyDeleteGraham
Send me the pix to: one_amp at hotmail dot com
DeleteHi again. All done. From the top of the engine. Didn't take off the distributor cap. Long neck circlip pliers are very much needed. The small ( 2 cm diameter ) neoprene/rubber o'ring/seal is the seat into which the thermostat sits into the body of the thermostat unit. Bit of a pry to get the old one out but take your time and all is OK.
ReplyDeleteAUD $46.00 complete kit and about 45 minutes to an hour.
If it all turns to custard when I do a real on road test I will let you know.
Regards
Graham
Great walk through! Thanks for putting this together. Putting the snap ring back in was the part that gave me the biggest headache because the only snap ring pliers that I could find anywhere weren't nearly long enough to reach that far back into the thermostat housing. I finally had success with a pair of needle nose pliers with a 45 degree bend.
ReplyDeleteThis doesn't seem to have solved my overheating problem though. Any other reasons why it would be running so hot?
Thanks very much. How old is the water pump? If it's pretty old it could be struggling to circulate water around the system. A temporary solution to stop you over heating in traffic is to turn on the heater to full.
DeleteI don't know how old the water pump is. I was wondering if that might be the culprit. I also just noticed that my fans aren't kicking on.
DeleteMy square dash model only has a single fan and it comes on when the temperature needle gets a little way past the half mark on the gauge. The rad temp sensor is located on the top corner of the rad, clean the electrical connections and see if that helps.
DeleteWhere does the black o-ring that comes with the thermostat go?. Below, or the top side?
ReplyDeleteNeither, the O-ring has a groove in it that is meant to fit over the body of the thermostat, look closely at photo 7
Delete